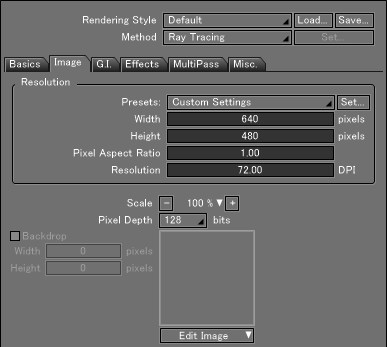
Image Tab
This tab enables you to specify the backdrop setting which merges an image onto the background, and the size of the background image to be rendered.

- Resolution Options
- This allows you to specify the settings related to the size (resolution) of the image to be rendered.
- Preset Pop-up Menu
- Commonly-used image sizes can be selected from this list of presets. You use Custom Settings if the Width and Height text boxes each have no size registered in Presets.
- Set Button
- Click this button to display Image Size Settings dialog. If you have specified the paper size and resolution from the Image Size Settings dialog, the required number of pixels is automatically calculated to automatically change the size of the image to be rendered.
See also Image Size Settings Dialog Box
- Width
- Specifies the width of the rendered image in pixels.
- Height
- Specifies the height of the rendered image in pixels.
- Pixel Aspect Ratio Text Box
- This setting can be used for rendering an image to be displayed on a device whose pixel ratio is not 1:1. In general, there is no problem in using default "1.00." Specify 0.90 for D1 output when photographed images are combined for commercial message images or the like. In this case, specify the image width as 720 pixels and the height as 486 pixels.
- Resolution
- Specifies the resolution of the image to be rendered with DPI. You use this option when executing Print from the File menu.
- Scale Button, Pop-up Menu
- These functions set the scale factor for the image in the Image Window. Clicking the + button increases the scale factor; clicking the - button decreases it. By clicking [V], you can also select a scale factor from the pop-up menu.
- Pixel Depth Pop-up Menu
- This menu allows you to select the color depth of the rendered image.
64 and 128 bit pixel depths are handled as HDRI, and result in better-looking images for use as the mapping materials of Image Based Lighting (IBL) or the like or when using effectors. Moreover, if the image is saved in the HDRI-supported format or the format that enables 16-bit color output, deterioration in the image quality due to editing by the image editing software can be suppressed. Increasing the pixel depth increases dramatically the amount of data. So, 64 bits is recommended if a large color depth need not be retained.
- Backdrop
- This checkbox becomes active when an image is loaded in the Picture Box. Turn this checkbox on to merge the image loaded in the Picture Box with the background of the Image Window.
- Width and Height Display
- In Width, enter a pixel value for the width of the image loaded in the Picture Box. In Height, enter a pixel value for the height of that image.
- Picture Box
- This displays the image loaded as a backdrop.
- Edit image Pop-up Menu
- Click this to display the image editing menus. In addition, the Professional and Standard grades display the plugin function. The plugin function can be applied to the image.