The Shade3D Workspace
This section describes the names and functions of the parts of the Shade3D screen.
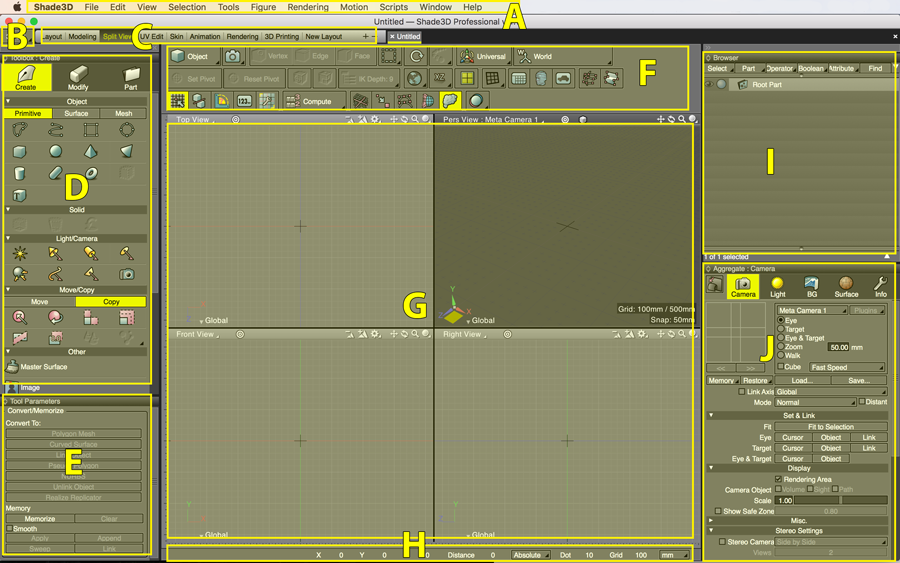
The following window layout appears by default when you start Shade3D.

A: Menu Bar; B: Modeling Mode Button; C: Window Layout Selector; D: Toolbox; E: Tool Parameters; F: Control Bar; G: Figure Window; H: Status Bar; I: Browser; J: Aggregate Window
- Menu Bar
- The menu bar displays the menus for using Shade3D.
See also The Menu Bar
- Modeling Mode (Shade3D Professional)
- In Shade3D Professional you can switch modeling modes between standard CG and CAD.
See also Switching Between CG and CAD Mode
- Window Layout Selector
- The Window Layout Selector is used to switch between previously-arranged window layouts. It can also be used to save or recall window layouts that you create.
The following window layouts are available as presets: - Toolbox
- The Toolbox contains tools for creating and modifying objects, and is divided into three tabs: Create, Modify, and Part.
See also Toolbox
- Tool Parameters
- The Tool Parameters Window displays the parameters for the tool selected in the Toolbox, giving you fine control over that tool. Conversions can be applied to objects that have already been created, and objects can be modified using the Memory tools.
See also Tool Parameters
- Control Bar
- Options for switching editing modes, snap settings, the working plane, Stereo Vision, and many other settings related to the Figure Window are located on the Control Bar.
See also Control Bar
- Figure Window
- The Figure Window is where you create and edit objects using the tools you have selected from the Toolbox.
See also Figure Window
- Status Bar
- The Status Bar displays the position of the 3D cursor, the 3D cursor's distance from the origin, and so on.
See also Status Bar
- Browser
- The Browser is used to hierarchically manage the elements of a 3D scene. For example, you can change and delete objects, combine joint structures, configure object attributes, show or hide objects, find objects by name, and more.
See also Browser
- Aggregate Window
- The Aggregate Window contains options for performing operations related to the camera, distant light, background, surface attributes, and more.
See also Aggregate Window
- ShadeExplorer
- ShadeExplorer is used to view the sample objects, surface textures, backgrounds, images, and other files included with Shade3D, in catalog form. You can also create your own catalogs.
See also ShadeExplorer
- Motion Window
- The Motion Window is used to collectively manage all the joints in a scene when creating an animation and to set joint values according to the sequence.
See also Motion Window
- Image Window
- The Image Window displays rendered images. The rendering method used, image size, and all other rendering settings can be selected here, and rendered images can be saved.
See also Image Window