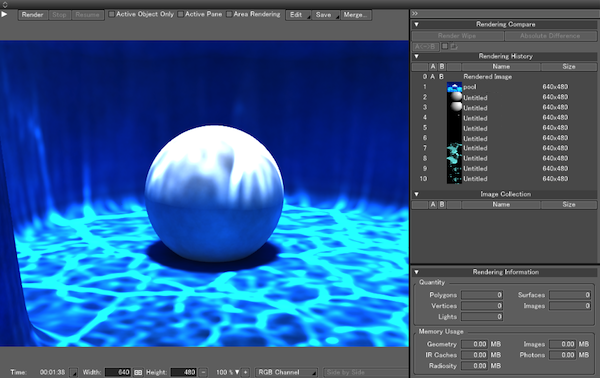
The Image Window Interface
Select View > Image Window to open the Image Window.
| Image Window (100%) |
|---|

|
Rendering History is available in Shade3D Professional.
- Show/Hide Rendering Settings
- This button is used to show or hide the Rendering Settings, where you can specify how the scene will be rendered.

See also Rendering Settings
- Render
- Click this button to begin rendering using the current settings.
- Stop
- Click this button to pause the rendering process.
- Resume
- Click this button after rendering has been stopped to resume the rendering process.
Important If the rendering settings are changed after rendering is stopped and then rendering is subsequently resumed, the final rendered image may not be accurate.
- Selection Only
- Only the currently selected objects are rendered.
- Active Viewport
- The currently active (selected) viewport is rendered.
- Area Rendering
- Turn this checkbox on to display a rectangular frame. You can move and resize it to specify the area of the image you wish to render. Choose Select All from the Edit pop-up menu to turn off Area Rendering.
- Edit
- This menu allows you to cut, copy, and clear the image currently in the Image Window. Select All returns the range of the area rendering to its initial status.
In addition, Shade3D Standard and Professional display any available plugin features. - Save
- Saves the current image. The following image formats can be saved:
- Targa file (.tga)
- Bitmap file (.bmp)
- JPEG file (.jpg)
- GIF file (.gif)
- TIFF file (.tif)
- PNG file (.png)
- OpenEXR (.exr)
- HDR file (.hdr)
- MPO file (.mpo)
- PFM file (.pfm)
- Flash file (.swf)
- Photoshop file (.psd) (Standard version or later)
- Merge...
- Click this button to display the dialog in which you can select a file to be merged. The selected image will be merged with the background of the image currently in the Image Window. The Merge button provides the same function as a backdrop set from the Image tab of Rendering Settings.
- Rendering Time
- The elapsed time used to render the image is displayed here. Click the
 button to the right of the time to select hour:minute:seconds or seconds format.
 - Width
- Specifies the width of the rendered image in pixels.
- Height
- Specifies the height of the rendered image in pixels.
- Keep Aspect Ratio Button
- When you turn on this button and change the width or height of the image, the opposite numerical value is automatically changed to the one that retains the current proportion.
- Scale (-, +) Buttons, Pop-up Menu
- These functions change the display zoom rate of the rendering image on the Image Window.
Click the - button to zoom out the image.
Click the + button to zoom in the image.
Clicking [V] will allow you to set a specific zoom setting of the displayed image. - Channel Pop-up Menu
- This menu allows you to display channel information of the image. Select RGB, RGBA, Alpha Channel, or pass whose retention is set by multipass rendering.
- Stereo Camera Pop-up Menu
- This allows you to change the stereo rendering method. Once you perform rendering with the stereo function, you can change the method without re-rendering.
- Show/Hide Rendering History
- This shows or hides the Rendering History. Rendering History is available in Shade3D Professional.
