Particle Physics Reference (Particle Physics 참조)
여기에 각 Particle Physics settings 및 기능이 설명되어 있습니다.
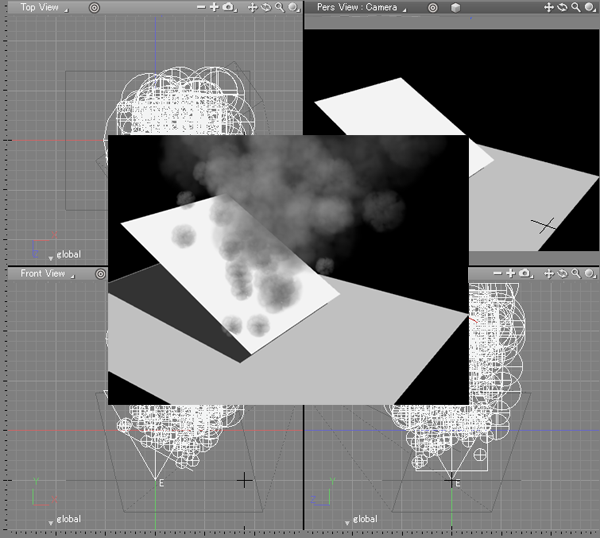
Particle Emitter Settings Dialog Box (Particle Emitter 설정 대화 상자)
Particle Emitters 관련 설정에 엑세스합니다.
Browser에서 emitter [Emitter -Particle Physics]를 선택한 다음 Browser select
menu Attributes...> Particle Emitter Settings...을 선택하여 설정에 엑세스합니다.
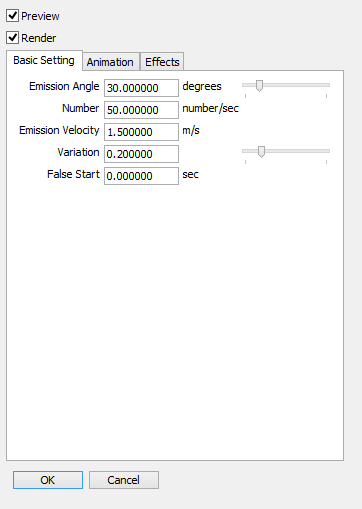
- Preview (미리보기)
- Figure Window의 Motion Window에서 설정된 particle motion을 표시합니다.
Particles는 spheres(구체)의 집합으로 표시됩니다. - Render Checkbox (Render 확인란)
- 체크하면 particles이 다른 objects와 함께 렌더링됩니다.
Basic Settings Tab

- Emission Angle Slider, Text Box (Emission Angle Slider 대화 상자)
- Particles가 emitted(방출되는) 각도를 설정합니다. Particle emitter cone의 중심을 통과하는 축은 0.0으로 간주합니다.
- Number Text Box (숫자 대화 상자)
- 초당 방출되는 particle의 갯수를 설정합니다.
초당 30프레임 애니메이션에서이 숫자를 30으로 나눈 것은 프레임당 방출되는 particle의 갯수입니다. - Emission Velocity (Emission 속도)
- Particles의 초기 속도를 초당 미터(m/s)로 설정합니다.
- Variation (변화도)
- 보다 자연스러운 외관을 위해 각 particle의 수명과 방출 속도를 설정에 따라 다르게 합니다.
- False Start (지연시키기)
- 지정된 시간 (초)만큼 particle의 방출을 지연시킵니다.
Animation Tab
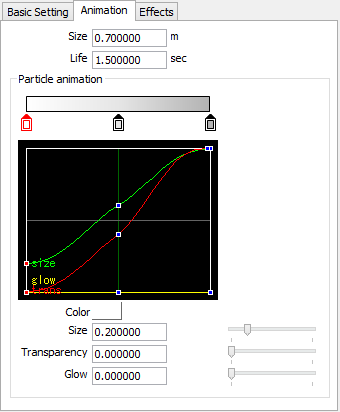
- Size (크기)
- Particles의 최대 초기 크기를 미터 단위로 설정합니다.
그래프는 0에서 100 %까지 측정하여 particles 크기에 애니메이션을 적용 할 수 있습니다. - Life (수명 주기)
- 생성부터 사라질 때까지 particle의 수명을 초 단위로 설정합니다.
- Particle Animation
-
- Gradient Bar

방출(emitted) 된 particle의 색상 변화를 설정합니다. Gradient Bar를 클릭하여 최대 6개의 새로운 마커를 추가 할 수 있습니다.
마커를 이동하려면 Gradient Bar를 따라 클릭하고 드래그하십시오. 마커를 삭제하려면 Gradient Bar에서 멀어지거나, 마커를 위 또는 아래로 드래그하십시오. 각 끝의 마커는 이동하거나 삭제할 수 없습니다.- Markers

Gradient Bar를 따라 색상의 임계 값을 표시합니다.
또한 크기, 투명도 및 광선을 수정합니다.- Lifecycle Graph
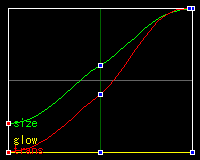
시간에 따른 입자의 크기, 투명도 및 광선을 표시합니다. 마커는 그래프에서 점으로 표시됩니다.- Color Box (색상)
- Lifecycle Graph에서 마커에 연결된 위치를 기준으로 Color ratio(색상 비율)을 설정합니다.
- Size (사이즈)
- Lifecycle Graph에서 마커에 연결된 위치를 기준으로 Size ratio(크기 비율)을 설정합니다.
- Transparency Slider, Text Box (투명도 Slider 대화 상자)
- Lifecycle Graph에서 마커에 연결된 위치를 기준으로 Transparency ratio(투명도 비율)을 설정합니다.
- Glow (발광)
- Lifecycle Graph에서 마커에 연결된 위치를 기준으로 Glow ratio(광선 비율)을 설정합니다.
0.0은 발광하지 않습니다. 1.0으로 설정하면 지정된 색상으로 광선이 방출됩니다.
Effects Tab (효과 Tab)
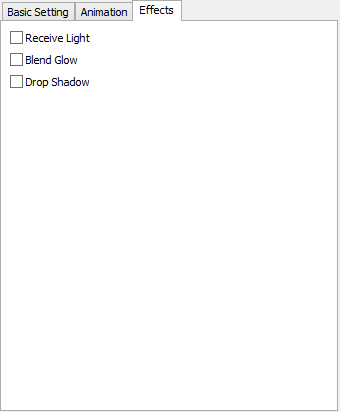
- Receive Light (빛 받기)
- Particle Emitter가 빛을 받도록 설정합니다. 이 설정을 끄면 Particle이 장면의 조명에 영향을받지 않으며 Billboard에서 설정 한 색상을 유지합니다.
Particle로 설정된 물체는 빛을받지 않습니다. - Blend Glow (발광 혼합)
- Billboard에서 설정 한 particles를 추가 blend를 사용하여 Animation Tab에서 설정한 glow값과 혼합합니다.
이 옵션을 선택하면 반짝이는 효과가 나타납니다. - Drop Shadow (그림자)
- 광원에서 그림자를 제거합니다. Distant lights, point lights 및 spot lights가 지원됩니다. Particles로 설정된 Objects는 그림자를 가지지 않습니다.
Wind Settings Dialog Box (Wind 설정 대화 상자)
Wind
Settings 대화 상자에서 모든 바람 효과 (Cross Wind, Turbulent Wind, Tornado Wind 및
Gravitational Pull)를 설정할 수 있습니다. 바람 설정은 Figure Window에서 미리 볼 수 있습니다.
Wind Settings 대화 상자를 열려면 Browser에서 [Particle Physics Name of the Wind] Part, then menu Attributes>Wind Settings....을 선택하십시오.
Cross Wind
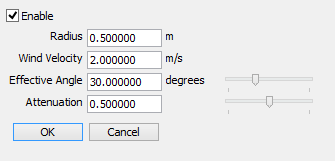
- Enable (사용 가능)
- Cross Wind 효과를 비활성화하려면이 확인란을 선택 취소하십시오.
- Radius
- 시작점을 중심으로 Wind Object의 반지름.
- Wind Velocity
- Wind Object의 시작점에서의 풍속.
- Effective Angle
- 시작점에서 Wind Object의 끝점 각도입니다.
- Attenuation
- 시작점으로부터의 거리에 따라 풍속이 얼마나 빨리 떨어지는 지 측정합니다.
Turbulent Wind
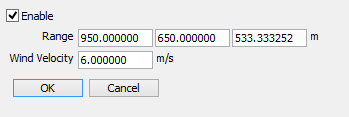
- Enable (사용)
- Turbulent wind effect(난기류 효과)를 비활성화하려면 이 확인란을 선택 취소하십시오.
- Range (범위)
- X, Y 및 Z 방향으로 측정 된 Turbulent wind(난류) 영역의 크기(미터)입니다.
- Wind Velocity (풍속)
- Turbulent wind(난류) 범위 내의 최대 풍속을 측정합니다.
Tornado Wind
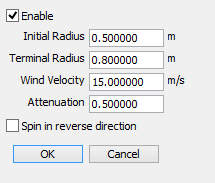
- Enable (사용)
- Tornado effects(토네이도 효과)를 활성화하려면이 확인란을 선택하십시오.
- Initial Radius (시작점 반지름)
- 시작점에서 Radius of the tornado(토네이도의 반경)을 정의합니다.
- Terminal Radius (끝점 반지름)
- 끝점에서 Radius of the tornado(토네이도의 반경)을 정의합니다.
- Wind Velocity (풍속)
- 시작점에서 최대 풍속을 측정합니다.
- Attenuation (감쇠)
- 시작점으로부터의 거리에 따라 풍속이 얼마나 빨리 떨어지는 지 측정합니다.
- Spin in Reverse Direction (반대 방향 회전)
- 토네이도가 위에서 볼 때 시계 반대 방향으로 회전하도록 회전 방향을 바꾸려면이 확인란을 선택합니다.
일반적으로 토네이도 바람은 시계 방향으로 회전합니다.
Gravitational Pull
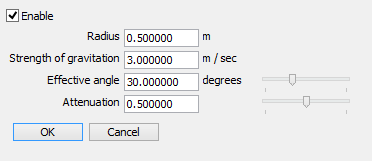
- Enable (사용)
- Gravitational Pull(중력 풀)을 비활성화하려면이 확인란을 선택 취소하십시오.
- Radius (반지름)
- 시작점을 중심으로 한 원의 반지름. 중력 풀의 종점이 기준점입니다.
- Strength of Gravitation (중력의 힘)
- 시작점에서 중력 풀의 강도를 정의합니다.
- Effective Angle (효과적인 각도)
- 시작점에서 중력 당김의 끝점 각도.
- Attenuation (감쇠)
- 시작점과의 거리에 따라 중력 당김의 강도가 얼마나 빨리 떨어지는 지 측정합니다.
Object Physics Settings Dialog Box (Object Physics Setting Dialog Box)
Physics based settings를 허용 할 수있는 object 관련 설정에 액세스하고 수정합니다.
Browser
의 physical[physical - Particle Physics] 파트 내부에서 object를 선택하고
Attributes > Physics Settings....을 선택하면 Object Physics Settings
Dialog Box에 액세스 할 수 있습니다.
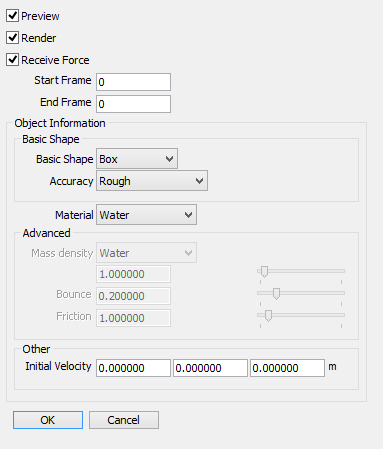
- Preview (미리보기)
- 그림 창에 적용된 Object Physics Settings가있는 객체를 표시합니다..
- Render (렌더)
- Object Physics Settings를 적용한 후 선택한 object를 렌더링합니다.
- Receive Force
- 이 옵션을 선택하면 선택한 object가 다른 object의 physics operations(물리 연산)으로부터 힘을 받을 수 있습니다.
- Start Frame
- Start Frame에서 효과적으로 충돌 설정이 적용된 다른 객체의 영향을받을 수 있습니다. Start Frame과 End Frame이 모두 0으로 설정되면 object는 애니메이션 전체의 다른 object로부터 힘을받습니다.
- End Frame
- Collision settings(충돌 설정)이 적용된 다른 프레임의 영향을 받아 End Frame으로 끝나는 오브젝트를 활성화합니다. Start Frame과 End Frame이 모두 0으로 설정되면 object는 애니메이션 전체의 다른 object로부터 힘을 받습니다.
- Object Information
-
- Basic Shape Group
-
- Basic Shape Pop-Up Menu
- Figure Window에 표시되는 미리보기 모양을 설정합니다. Sphere, Box 또는 Mesh 객체를 선택할 수 있습니다. Preview objects는 Figure Window에서 "p"로 표시됩니다.
- Accuracy Pop-Up Menu
- Preview object의 세분 수를 설정합니다.
Coarse (no subdivision), Normal (8 subdivisions), Fine (16 subdivisions) 및 Very Fine (32 subdivisions) 중에서 선택합니다. (Subdivision=분할)
- Material Pop-Up Menu
- 재료 유형에 따라 Mass Density(질량 밀도), Bounce(바운스) 및 Friction values(마찰 값)이 결정됩니다.
Gold, Uranium, Lead, Copper, Iron, Aluminum, Magnesium, Water, Wood, Air 또는 Smoke 중에서 선택하거나 사용자 정의를 선택하여 object의 Mass Density, Bounce 및 Friction에 대한 다른 설정을 지정하십시오. - Advanced Settings
- 해당 옵션은 Material Pop-up Menu가 to Custom(사용자 정의)로 설정된 경우에만 사용할 수 있습니다.
- Mass Density
- Particle의 평균 밀도.
Gold, Uranium, Lead, Copper, Iron, Aluminum, Magnesium, Water, Wood, Air 또는 Smoke에서 선택하거나 to Custom(사용자 지정)을 선택하여 값을 지정하십시오. - Bounce
- Particles에 의해 나타나는 바운스(Bounce) 양을 설정합니다.
- Friction
- 충돌에 대한 마찰 계수를 설정합니다.
- Other Settings
-
- Initial Velocity
- X, Y 및 Z 방향 (각각 왼쪽에서 오른쪽으로)으로 초당 미터 (m/s) 단위로 객체의 초기 속도를 설정합니다.
Particle Physics Settings Dialog Box
Toolbox: Create menu Particle Physics > Billboard를 선택하여 생성된 Billboard를 수정할 수 있습니다.
Browser
에서이 대화 상자에 액세스하려면 (particle billboard) [Billboard - Particle
Physics]부분을 선택한 다음 Attributes> Physics Settings..을 선택하십시오.
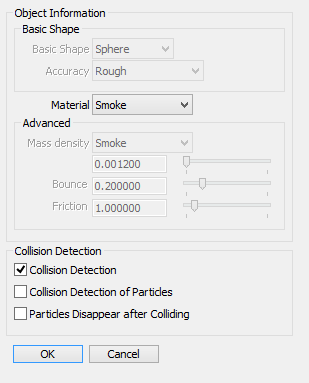
- Object Information
-
- Basic Shape Group
-
- Basic Shape Pop-Up Menu
- Figure Window에 표시되는 Preview shape를 설정합니다. Sphere, Box 또는 Mesh 모양을 선택할 수 있습니다. Preview objects는 그림 창에서 "p"로 표시됩니다.
- Accuracy Pop-Up Menu
- Sets the number of subdivisions of the preview object.
Select from Coarse (no subdivision), Normal (8 subdivisions), Fine (16 subdivisions) and Very Fine (32 subdivisions).
NoteBillboard particles are always set to a Sphere basic shape and Coarse accuracy.
- Material Pop-Up Menu
- The type of material determines the Mass Density, Bounce and Friction values.
Choose from Gold, Uranium, Lead, Copper, Iron, Aluminum, Magnesium, Water, Wood, Air or Smoke, or select Custom to specify other settings.- Advanced Settings
- These options are only available if the Material Pop-Up Menu is set to Custom.
- Mass Density
- The average density of the particle.
Choose from Gold, Uranium, Lead, Copper, Iron, Aluminum, Magnesium, Water, Wood, Air or Smoke, or select Custom to specify other settings. - Bounce
- Sets the amount of bounce exhibited by the particles.
- Friction
- Sets the coefficient of friction for collisions.
- Collision Detection Group
-
- Collision Detection
- Particles will be affected by the collision detection of other objects.
- Collision Detection of Particles
- Particles will be affected by the collision detection of other particles.
- Particles Disappear after Colliding
- Particles that collide with other objects or particles will disappear.
Billboard Settings Dialog Box
Modify settings for
Billboard objects, objects created by selecting Toolbox: Create Plugins
Group menu Particle Physics > Billboard.
Select the particle [Particle Physics - Billboard] Part then from Browser menu Attributes>Billboard Settings....
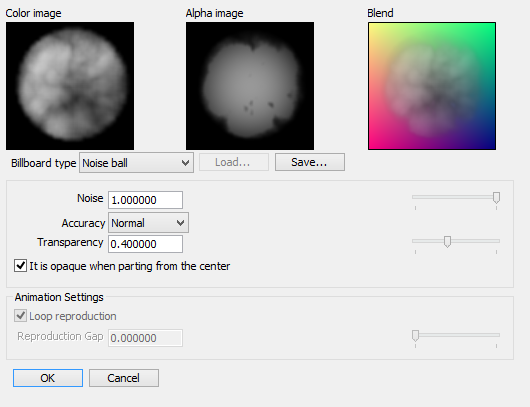
- Picture Box
- See a preview of the Billboard image.
Displays a preview of the Color image, Alpha image and Blend. If you load a video, the animation plays. - Billboard Type Pop-Up Menu
- Select a Billboard type.
You can select from Noise Ball or custom image. - Load... Button
- Load an image file to become the Billboard image.
This is only available if the Billboard Type is set to custom image. - Save... Button
- The current Billboard custom image is saved as a file.
If you select the Billboard type Noise Ball, then the image of the noise ball is saved as an RGBA image. If you select the Billboard type Custom Image, the Master Image applied to the Billboard is saved. - Noise
- Sets the contrast value of the noise.
This is only applicable if the Billboard type pop-up menu is set to Noise Ball. - Accuracy
- Sets the density of the noise.
You can select from Rough, Normal and Fine values. - Transparency
- Sets the Transparency value. Changes appear only in the alpha of the Picture Box.
- It is opaque when parting from the center
- When checked, the alpha becomes more transparent as distance increases from the center. It is only available if the Billboard type selected is Noise Ball.
- Loop Reproduction
- If a movie is selected as a Billboard image, then the movie plays in a loop.
- Reproduction Gap
- If a movie is selected as a Billboard image, then the start position of the movie is randomized.
Particle Physics Settings Dialog Box
This dialog provides the necessary world rendering settings for Particle Physics.
This Particle Physics Settings dialog can be access from menu Render
> Render Settings, Effects Tab, then from the Effector set to
Particle Physics, click the Set... Button.
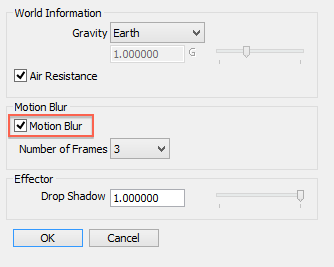
- World Information Settings
-
- Gravity Pop-up Menu
- Select Custom to specify another value for gravity.
You can also choose from Custom, Jupiter, Neptune, Earth, Saturn, Venus, Uranus, Mars Mercury and Moon. - Gravity
- You can set the custom value of gravity in Gs. 9.8 m/s^2 corresponds to 1 G, 1.0 or as on Earth. This option is available if you select Custom from the Gravity Pop-Up Menu.
- Air Resistance
- Enables air resistance.
- Motion Blur Settings
-
- Motion Blur
- Enables Motion Blur.
- Number of Frames
- Sets the number of frames over which the motion blur appears.
- Effector Settings
-
- Drop Shadow
- Sets the strength of shadows dropped by Billboard particles, with values approaching 1.0 producing darker shadows.
Shadows cast by Billboard particles on each other are not affected by this setting.