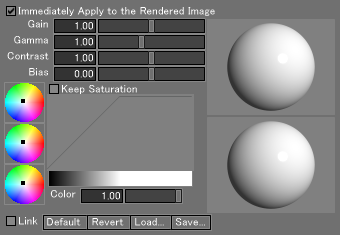
Color Correction Window
Select View > Color Correction to open the Color Correction window. The Color Correction window provides simple controls for rendering brightness, contrast, color balance, and saturation.
Settings configured in the Color Correction window are applied to the rendered image. The settings are applied in real color (32-bit RGB) without deterioration of image quality.
| Correction |
|---|

|
- Immediately Apply to the Rendered Image (Shade3D Professional)
- When this option is selected, any adjustments within the Color Correction window are immediately applied in real time to the rendered image.
Note To apply real time Color Correction, the pixel depth needs to be set to 128 bits on the Rendering Settings Image tab. At pixel depth of 32 or 64 bits the image needs to be re-rendered before color correction can be applied.
- Gain
- Configures the brightness of the whole image. Set a value between 0 and 2.
- Gamma
- Configures the brightness of the mid colors of the image. Set a value between 0 and 2.5.
- Contrast
- Configures the contrast of the image. Set a value between 0 and 2.
- Bias
- Configures the brightness of the whole image, leaving the tone gradation unchanged.
- Keep Saturation
- Changes the brightness, securing the RGB ratio.
- Before/After Previews
- The top preview shows the image before correction, and the bottom preview shows the rendered image after applying color correction settings. A white ball image is initially displayed on the panel, and then the picture in the image window is rendered, resized.
- Tone Curve
- Shows the color correction curve. The vertical axis indicates the corrected colors/output levels. The horizontal axis indicates the original colors/input levels.
After correction, the closer to the vertical the tone curve, the higher the contrast, or the closer to the level the tone curve the flatter the contrast. The higher the tone curve, the higher the brightness, or the lower the tone curve, the lower the brightness. The tone curve is directly unchangeable by dragging. - Color Scale
- Shows the color scale to which the tone curve is applied.
- Color Slider
- Use this to change the saturation of the color specified on the Highlight, Mid Color, or Shadow color disk. When the color slider is set to 0, the color balance is not corrected.
- Highlight Color Disk
- The highlight color disk, the topmost one of the three disks, allows you to specify the color to be handled for the highlight brightness, intending color balancing. Click on the disk or drag the black square pointer to specify the RGB ratio (hue). Click the disk, holding down the Ctrl key (Win)/Option key (Mac), to show the color picker of the operating system. You may use it for color correction.
- Mid-Tone Color Color Disk
- The mid-color color disk, the middle one of the three disks, allows you to specify the color to be handled for the mid-tone-color brightness, intending color balancing. Click on the disk or drag the black square pointer to specify the RGB ratio (hue). Click the disk, holding down the Ctrl key (Win)/Option key (Mac), to show the color picker of the operating system. You may use it for color correction.
- Shadow Color Disk
- The shadow color disk, the bottommost one of the three disks, allows you to specify the color to be handled for the shadow brightness, intending color balancing. Click on the disk or drag the black square pointer to specify the RGB ratio (hue). Click the disk, holding down the Ctrl key (Win)/Option key (Mac), to show the color picker of the operating system. You may use it for color correction.
- Link
- Turn it on to set the same color to the Highlight, Mid-Tone Color, and Shadow color disks. The pointers on the color disks interlock.
- Default
- This button restores the initial settings.
- Revert
- This button cancels the operation you just did.
- Load...
- Loads Color Correction settings from a color correction settings file (.shdcor/.xmlshdcor).
- Save...
- Saves the Color Correction window settings as a color correction settings file (.shdcor or .xmlshdcor).