QuickTime VR Exporter
QuickTime VR Exporter makes it possible to view images rendered in Shade3D as virtual reality movies in Apple's QuickTime Player. By playing movies in QuickTime Player it is possible to change the camera view dynamically using the mouse, creating interactive scenes.
Each QuickTime VR format is described below.
Important In order to export to the QuickTime VR format, QuickTime must be installed on your computer. If QuickTime is not installed on Windows, install it using the installer on the application's CD-ROM. QuickTime is included with Mac OS X, so no installation is necessary.
Important QuickTime X is included with Mac OS 10.6 and later, and in this version QuickTime VR is not supported. As a result, QuickTime VR movies cannot be exported properly from Shade3D. Please install QuickTime 7 from the Mac OS 10.6 installation DVD or from Apple's website to solve this problem.
Important QuickTime VR export is not available on 64bit versions. In order to render an animation in .mov format, use a 32bit version.
Exporting QuickTime VR Panorama Movies
Shade3D scenes exported as QuickTime VR Panorama can be viewed in 360 degrees horizontally centered on the Eye point. Depending on the settings some limited vertical camera movement may also be possible.
- First set up the scene you wish to export as a QuickTime VR Panorama movie.
- Adjust the Background and rendering settings as you would before rendering out a normal scene.
- Adjust the position of the camera that you wish to use for rendering to the center of the QuickTime VR scene.
Note When playing QuickTime VR Panorama movies, the initial image is always set to the Z axis, not the camera view.
- Select File > Export > QTVR Panorama.
A Save as dialog box opens. - Choose a name and save location for the QuickTime VR movie file and click OK.
The QTVR Panorama dialog appears.
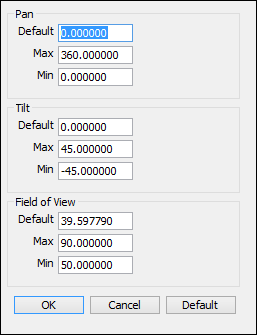
- Adjust the QTVR Panorama values if you wish and click OK.
The Image Window opens and rendering begins.
Note The size of the rendered image is calculated automatically based on the default FOV value and the height and width specified in the Rendering Settings. The size of the movie played in QuickTime Player is the same as that specified by the resolution, height and width in the Rendering Settings.
- When the rendering completely finishes the QuickTime VR Panorama movie will be created.
QTVR Panorama Dialog Box
The options available in the QTVR Panorama dialog box are described below.
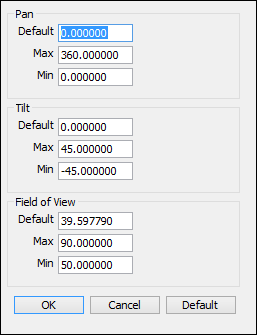
- Pan Group
- Pan is the horizontal camera movement.
- Default
- The angle in the horizontal plane the camera is facing initially during movie playback. The default value is 0.
- Max
- The maximum angle to which the camera can rotate in the horizontal plane during playback. The default value is 360.
- Min
- The minimum angle to which the camera can rotate in the horizontal plane during playback. The default value is 0.
Note Maximum and minimum Pan values of 360 and 0, respectively, results in a movie in which the camera can rotate with complete freedom in the horizontal plane.
- Tilt Group
- Tilt is the vertical camera movement.
- Default
- The angle in the vertical plane the camera is facing initially during movie playback. The default value is 0.
- Max
- The maximum angle to which the camera can rotate in the vertical plane during playback. The default value is 45. Values greater than 45 degress are not possible with QuickTime VR Panorama movies.
- Min
- The minimum angle to which the camera can rotate in the horizontal plane during playback. The default value is -45. Values less than -45 degress are not possible with QuickTime VR Panorama movies.
- Field of View Group
- Field of View is the viewable angle of the image.
- Default
- The standard camera field of view during movie playback.
Note The size of the rendered image is calculated automatically based on the default FOV value and the height and width specified in the Rendering Settings.
- Max
- The widest camera angle when viewing the movie during playback.
Note If there are zoom in and zoom out buttons on the QuickTime VR movie player, this angle is equal to the zoomed out view. Zoom controls differ by player.
- Min
- The narrowest camera angle when viewing the movie during playback.
Note If there are zoom in and zoom out buttons on the QuickTime VR movie player, this angle is equal to the zoomed in view. Zoom controls differ by player.
Exporting QuickTime VR Cubic Movies
Shade3D scenes exported as QuickTime VR Cubic can be viewed in 360 degrees horizontally as well as +/-90 degrees vertically. This added vertical freedom of movement results in even greater dynamic field of views.
- First set up the scene you wish to export as a QuickTime VR Cubic movie.
- Adjust the Background and rendering settings as you would before rendering out a normal scene.
- Adjust the position of the camera that you wish to use for rendering to the center of the QuickTime VR scene.
Note When playing QuickTime VR Cubic movies, the initial image is always set to the Z axis, not the camera view.
- Select File > Export > QTVR Cubic.
A Save as dialog box opens. - Choose a name and save location for the QuickTime VR movie file and click OK.
The QTVR Cubic dialog box appears.
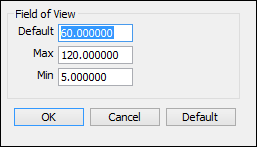
- Adjust the QTVR Cubic values if you wish and click OK.
The Image Window opens and rendering begins.Note The size of the rendered image is calculated automatically based on the width specified in the Rendering Settings. Altogether 6 images will be rendered. For example, if the width of the render is set to 100 and the height to 1000, six images each with a height and width of 100 will be rendered. The size of the movie played in QuickTime Player is the same as that specified by the resolution, height and width in the Rendering Settings.
Once rendering starts a progress bar is displayed to show the percent complete. To cancel the QTVR movie rendering click the Cancel button in the progress bar dialog. The Cancel button in the Image window will not cancel a QuickTime VR movie render.

- When the rendering completely finishes the QuickTime VR Cubic movie will be created.
QTVR Cubic Dialog Box
The options available in the QTVR Cubic dialog box are described below.
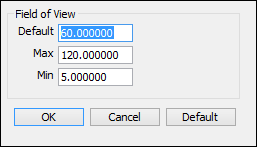
- Field of View Group
- Field Of View is the viewable angle of the image.
- Default
- The standard camera field of view during movie playback.
- Max
- The widest camera angle when viewing the movie during playback.
Note If there are zoom in and zoom out buttons on the QuickTime VR movie player, this angle is equal to the zoomed out view. Zoom controls differ by player.
- Min
- The narrowest camera angle when viewing the movie during playback.
Note If there are zoom in and zoom out buttons on the QuickTime VR movie player, this angle is equal to the zoomed in view. Zoom controls differ by player.
Exporting QuickTime VR Object Movies
Shade3D scenes exported as QuickTime VR Object movies can also be viewed in 360 degrees horizontally and +/-90 degrees vertically but the camera can be focused on an object in the scene, rotating around a single point to view it from all angles.
- First set up the scene you wish to export as a QuickTime VR Object movie.
- Adjust the Background and rendering settings as you would before rendering out a normal scene.
- Move the Target of the camera you will use to render to the center of the target object. Adjust the Eye and zoom level as necessary.
Note QuickTime VR Object movies use the camera Target point as the center of the scene and rotate about that point using a radius equal to the distance between the camera Target point and the Eye point. The camera field of view is applied directly to the QuickTime VR Object movie.
Note When playing QuickTime VR Object movies, the initial image is always set to the Y axis, not the camera view. - Select File > Export > QTVR Object.
A Save as dialog box opens. - Choose a name and save location for the QuickTime VR movie file and click OK.
The QTVR Object dialog box opens.
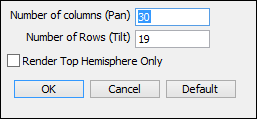
- Adjust the QTVR Object values if you wish and click OK.
On Windows, the Image Window opens and rendering begins.
On Mac OS X, first a Compression Settings dialog box appears. After choosing the compression settings and clicking OK, the Image Window opens and rendering begins. It is recommended to use the default Compression Settings except for adjusting the Compression Type.Note The size of the rendered image is calculated automatically based on the height and width specified in the Rendering Settings. The number of frames rendered is equal to the Number of Columns (Pan) multiplied by the Number of Rows (Tilt), as set in the QTVR Object dialog box. For example, a movie rendered with 30 columns and 19 rows will have (30 x 19) = 570 frames.
Once rendering starts a progress bar is displayed to show the percent complete. To cancel the QTVR movie rendering click the Cancel button in the progress bar dialog. The Cancel button in the Image window will not cancel a QuickTime VR movie render.

- When the rendering completely finishes the QuickTime VR Object movie will be created.
QTVR Object Dialog Box
The options available in the QTVR Object dialog box are described below.
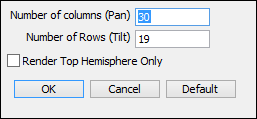
- Number of Columns (Pan)
- The number of frames rendered in the horizontal direction.
Note The number of columns multiplied by the number of rows will determine the size of the rendered image. A greater number of frames will result in smoother movie playback but will increase the rendering time and resulting file size.
- Number of Rows (Tilt)
- The number of frames rendered in the vertical direction.
Note The number of columns multiplied by the number of rows will determine the size of the rendered image. A greater number of frames will result in smoother movie playback but will increase the rendering time and resulting file size.
- Render Top Hemisphere Only Checkbox
- When selected, only the upper hemisphere is rendered. Use this to restrict the view to the top half of the scene, useful when you wish to hide the underside of objects or for scenes with a ground plane.