FBX Export
Select File > Export > FBX... to open the FBX Export Settings.
The file type, version, surface material and animation settings can all be specified for the exported file. In Shade3D for Unity, there are fewer options that mainly target Unity specific export.
FBX Export Settings
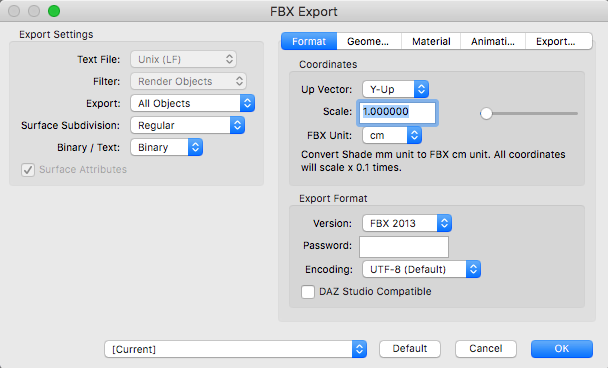
- Format Tab
- Coordinates Settings
-
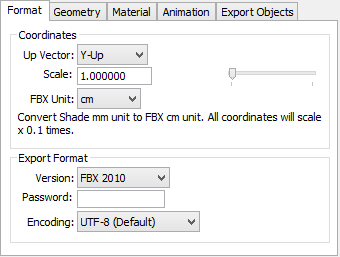
- Up Vector
- Specifies the orientation (the up axis) of the coordinates in the exported file. Select either Y-Up or Z-Up. Select Y-Up if using the exported file in Shade3D or Autodesk Maya. Select Z-Up for use in Autodesk 3D Studio MAX and iClone (3DXchange). The orientation is determined automatically within the FBX file, so normally it is not necessary to change this setting.
- Scale
- Specifies the size ratio when exporting objects.
- FBX Unit (Shade3D)
- Select either mm (millimeters) or cm (centimeters--the FBX default units) for the FBX scene. If cm are used, the coordinate values will be stored at one-tenth (1/10) their original size. Select cm when exporting FBX files for Unity.
- Export Format Settings
-
- Version
- Specifies the FBX file version. Select an appropriate version based on the destination application.
- Password
- Enter a password here to password-protect the FBX file (optional).
Password protection is only available when Binary is selected from the Type pop-up menu. - Encoding
- Select either UTF-8 or ShiftJIS for the text encoding used for object names in the exported FBX file.
Select an encoding to match the destination application, since some applications will not accept a different encoding. - DAZ Studio Compatible
- When selected, the FBX will be exported with bones and skin usable in DAZ Studio. The scene must follow DAZ Studio's rules for hierachical structure:
Scene Hierarchy Rules
CharacterName (Bone)
CharacterName.Shape (Polygon Mesh)
boneA (Bone)
boneB (Bone)
boneC (Bone)
- The root bone must be placed at the 0, 0, 0 position. The transformation matrix must be a unit matrix.
- "CharacterName" is an object name of your choice.
- Place polygon meshes that are children of the root bone with ".Shape" after the object name. These polygon meshes can be placed anywhere as long as they are directly below the child elements of the root bone.
- The bone structure (here, boneA-boneB-boneC) forms a hierarchy of the children of one bone.
- When creating or setting bones in Shade 3D, turn off the Auto Align checkbox under Bone Axis Alignment in the Object Info Window.
- Geometry Tab
-
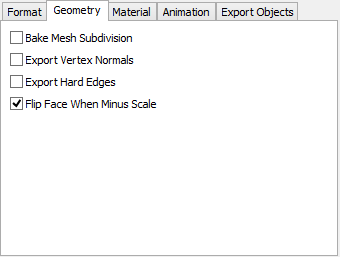
- Bake Mesh Subdivision
- If selected, polygon mesh rounded corners are expressed as subdivisions of the polygon mesh. If unselected, rounded corners are ignored.
- Export Smoothing Group Info
- When selected, the Threshold Angle of polygon meshes is exported as Smoothing information for each edge. This is important when exporting to software that supports FBX with Smoothing Group information.
- Export Vertex Normals
- Exports the vertex normal of each face. Exporting the normals results in larger file sizes, so deselect this option unless necessary.
As an example, let's create a polygon mesh box and cylinder in Shade3D and then export them to FBX format.
If Export Vertex Normals is unselected, object edges are rounded and smoothed.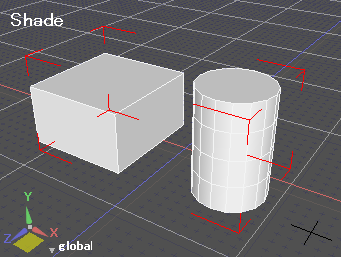
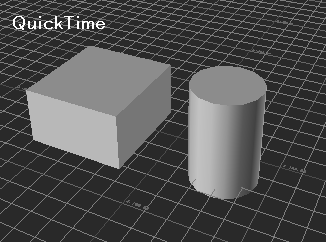
Below you can see the exported objects viewed in QuickTime.
If Export Vertex Normals is selected, edges with normals will be shaded correctly when viewed in applications that can read the normal data, such as QuickTime.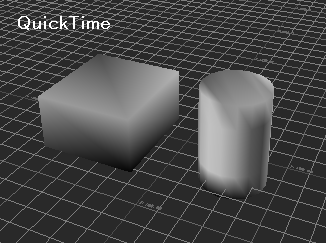
- Export Hard Edges
- If a single vertex is shared by multiple faces and each normal has a different orientation, adds new vertices at the same positions and separates these from the shared vertex.
This is useful when smooth shading is not desirable for face borders in the case of tools that do not accept normals.
However, if the number of vertices per face increases the object structure will change.
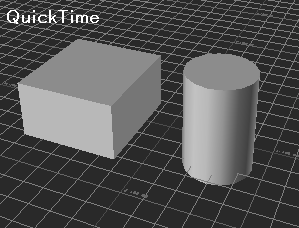
Let's return to our above example using the polygon mesh box and cylinder.
As when exporting with the Export Vertex Normals option off, if exporting with the Export Hard Edges Checkbox deselected, then all edges will appear rounded and smooth shaded.
If this option is selected and Export Vertex Normals deselected, then edges will have normals that are shaded correctly.
- Flip Face When Minus Scale (Shade3D)
- If the transformation matrix of an exported part or joint contains a negative scale value, the polygon or curved surface face may need to be flipped.
When selected, if the accumulated scale value traced back to the root part is negative, the faces will be automatically flipped. Select this option when exporting FBX to Unity, QuickTime, 3ds Max, or Maya. Deselect this option when exporting to 3DXchange or iClone. - Export Vertex Color
- Select None, Vertex Only, or Vertex with Face.
- Material Tab
-
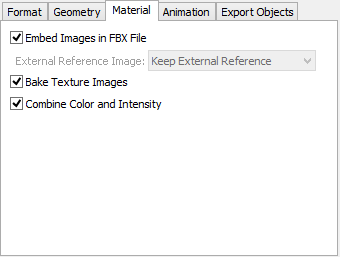
- Embed Images in FBX File
- When selected, images are embedded in the FBX file. When deselected, images are saved in PNG format to the same folder as the FBX file.
Password protection is only available when Binary is selected from the Type pop-up menu. - External Reference Image
- If Keep External Reference is selected, texture images will use the external reference path, and no images will be generated.
If Duplicate Same File is selected, texture images will use copies of the images in the external reference path. (These are placed in the same folder as the exported FBX file.)
If the Embed Images in FBX File checkbox is selected, this option is disabled, and texture images will be included inside the FBX file. - Bake Texture Images (Shade3D)
-
If selected, the following mapping settings, if set, will be applied to the image: Invert Color, Rotate 90 Degrees, Horizontal Flip, Vertical Flip, and Repeat.
When unselected, Horizontal Flip, Vertical Flip, and Repeat, if set, are stored as scale data for the FBX material. The image itself is not baked.
If Invert Color or Rotate 90 Degrees are set, they are baked in the image.
This can save resources if the same image is mapped multiple times with different Repeat settings.
- Combine Color and Intensity (Shade3D)
- If selected, Shade3D combines the color and intensity values to generate new, combined color values for the FBX file. If deselected, the color and intensity are exported separately.
Depending on the destination application, the intensity value may not be used in the texture. In that case, select this option.
- Animation Tab
-
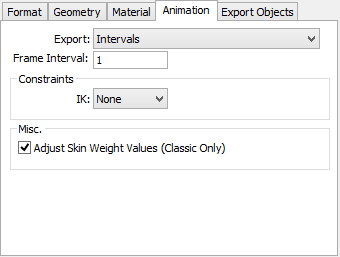
- Export
- Specifies how to export the animation.
Key Frames: Only the key frames are exported.
Intervals: Key frames plus frames at the specified interval are exported.
Two Layers (Key Frames + Intervals): Key frames and frames at the specified interval are exported on separate tracks.
None: The animation is not exported. - Frame Interval
- Specifies the interval used for exported frames. (Has no effect if only key frames are exported.)
- IK (Shade3D Standard and Professional)
- Specifies the handling of IK during export.
Choose whether to export IK settings by selecting either Apply or None. Select Bake to record key frames for joint movement based on IK information.
- Misc. Settings (Shade3D)
-
- Adjust Skin Weight Values (Classic Only)
- Specifies the handling of Skin Window joint settings during export.
If selected, skin values are automatically converted and adjusted. If unselected, skin values are exported as-is. Normally it is better to select this option.
- Export Objects (Shade3D)
- Select which elements are exported using the checkboxes.
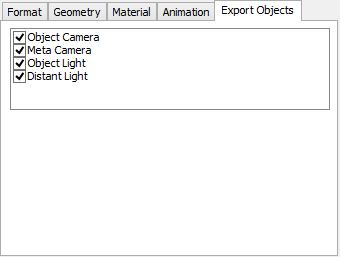
- Select binary or text format via the Binary/Text option in Basic Settings.
- The following settings are used for Shade3D for Unity:
Group Settings Default Format Version FBX 2010 Password Encoding UTF-8 Geometry Flip Face When Minus Scale On Material Bake Texture Images Off Combine Color and Intensity On Misc. Adjust Skin Weight Values On Export Objects Object Cameras Off Meta-camera Off Object Lights Off Distant Lights Off
Shade3D for Unity Limitations
The following are the main differences between Shade3D for Unity and other versions of Shade3D:
- Only one UV layer can be exported.
- Only diffuse reflection (color) and normal maps can be exported for surfaces (one mapping layer of each type).
- Lights (spotlights, point lights, directional lights, and distant lights) and cameras are not exported.
FBX Export Specifications
Object Naming
- Exported images have the name specified by the master image.
If an image with the same name already exists, an index number is appended to the name. - Exported materials have the master surface name if they have been set as a master surface.
If they have only been applied to objects directly, they will be called "material_" + an index number.
If a material with the same name already exists, an index number is appended to the name. - If special characters have been used in the object, master surface, or image name, they will be replaced with underscores (_).
- Index numbers will not be appended to object names (such as that of polygons, joints, and lights) even if their names are not unique.
Some 3D tools may require unique names; in that case, rename any objects as necessary before export.
Scene Units
The basic scene unit in Shade3D is millimeters (mm). Game development environments like Unity use centimeters as their scene unit. Please check the documentation of your game development environment for specifics.
- Shade3D ver. 14 and later
-
If mm is selected as the FBX units, exported coordinates are stored in the FBX data without conversion.
If cm is selected as the FBX units, exported coordinates are multiplied by 0.1 (one-tenth) and then stored as cm in the FBX data.
Objects Converted during Export
All objects are exported either together as a single mesh or as multiple meshes.
| Shade3D Object | FBX | Notes |
|---|---|---|
| Closed line | All objects exported as single mesh, or as multiple meshes | If the closed line object does not lie on a plane in Shade3D it is subdivided into triangles. The Object Info Hole checkbox is not supported |
| Revolved line | The Closed checkbox and the Revolve Begin/End parameters in the Object Info Window are supported for revolved line objects in Shade3D. | |
| Extruded line | ||
| Disk | ||
| Revolved disk | The Closed checkbox and the Revolve Begin/End parameters in the Object Info Window are supported for revolved disks in Shade3D. | |
| Extruded disk | ||
| Sphere | ||
| Curved surface | ||
| Polygon mesh | Round Edge is supported for polygon meshes. | |
| Meta-mesh | ||
| Link object |
Surface Attributes Support
- Only image maps are exported.
- Multiple mapping layers (Diffuse, Bump) are supported. (Shade3D)
In Shade3D for Unity, up to one diffuse color layer and one normal mapping layer are exported. - Multiple UV layers are supported. (Shade3D)
Shade3D for Unity supports one UV layer. - Face Groups are supported.
- For projection mapping, only the Wrap method is supported.
- If applying the Mask attribute to an image map, adjust the alpha channel of the image. If the Diffuse value is equal to 1.0, Mask will not be applied when exporting the FBX file.
-
It is possible to apply alpha transparency to a single layer of diffuse image as shown at the following image.
This means a single diffuse color image can transmit or mask light.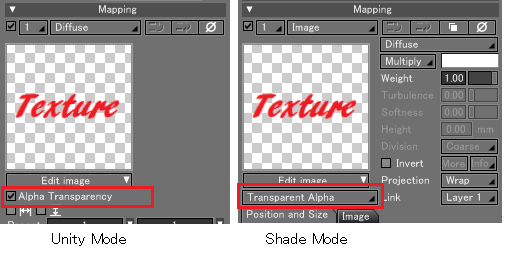
If using alpha transparency, specify an image with an alpha channel such a PNG or targa file. -
If a master surface is used as a surface material in Shade3D, it will export as a material.
In this case, the material name will be used directly from the master surface.
The differences between Shade3D for Unity and Shade3D are as follows:
| Function | Shade3D for Unity | Shade3D | Notes |
|---|---|---|---|
| Diffuse (color, value) | O | O | |
| Specular 1 (color, value) | O | O | |
| Specular 1 Size | O | O | Added in Shade3D 13.2 |
| Reflection (color, value) | O | O | |
| Transparency (color, value) | O | O | |
| Ambient (color, value) | O | O | |
| Glow (color, value) | O | O | |
| Mapping: Diffuse | O (single layer) | O | |
| Mapping: Normal | O (single layer) | O | |
| Mapping: Bump | x | O | |
| Mapping: Mask | x | O | |
| Mapping: Transparency | x | O | Added in Shade3D 13.2 |
| Mapping: Reflection | x | O | Added in Shade3D 13.2 |
Image Support
- Even if there are unused master images in the scene, FBX export will also save them to the file.
- All imported images in the scene will export in .png format with alpha values included, except for external reference images.
- External reference images will be exported without being converted to a different file format.
Referenced images used for surfaces with the following attributes will be replaced during export.
- Black Key Mask
- White Key Mask
- Mapping: Invert
- Mapping: Horizontal Flip
- Mapping: Vertical Flip
- Mapping: Rotate 90 degrees
- Mapping: Repeat
In Shade3D for Unity, and also when the Bake Texture Images option is unselected, the Horizontal Flip, Vertical Flip, and Repeat settings are passed to the image scale element in the FBX file without modifying the image itself.
When using only Horizontal Flip, Vertical Flip, or Repeat, the image file cannot be replaced, and the image will be exported with an index number appended to its file name.
In this case external reference images will also be exported in PNG format.
If the Bake Texture Images option is selected and mapping is set to repeat, the exported image size will change.
If the original image size is (width, height) and the number of repetitions is (repeat_x, repeat_y), then the exported image size will be (width * repeat_x, height * repeat_y), to a maximum width or height of 4096 pixels.
If Repeat is not set, the image width and height do not have this 4096 pixel limitation.
Joints Support
| Shade3D Object | FBX | Notes |
|---|---|---|
| slider joint | part | |
| scale joint | ||
| uniscale joint | ||
| path joint | ||
| light joint | ||
| rotator joint | Skeleton | |
| ball joint | Skeleton | |
| bone joint | Skeleton |
Animation Support
Animation settings are exported. In some cases an animation will not export correctly if a negative value is entered for a Scale element in a joint's Transformation Matrix.
The Animation Stack exported from FBX contains a single timeline output.
However, if the export option "Two Layers (Key Frames + Intervals)" is selected, then two animation stacks will be exported.
The keyframes layer will have the FBX file name appended with "anim_keyframes", and the interval layer will be appended with "anim_intervals".
Skin Support
When exporting classic skin, it will be converted to Vertex Blending skin.
In this case, Vertex Blending skin weight uses the normalized flag for the conversion.
For bone joints that affect each vertex of the polygon mesh skin with normalized weight assigned, a process for correcting the sum of the weight values to be 1.0.
If you want to store the vertex weight values in the FBX skin vertex blending method, just simply store them in FBX format. As FBX skins and skins with a blend vertex in Shade3D are having the same specifications.
In this case, the normalized flag for vertex weight is not used in FBX.
Camera Support
Shade3D for Unity does not support camera export.
Shade3D supports meta-camera and camera object export. Camera animation is not supported.
Lighting Support
Shade3D for Unity does not support light export.
Shade3D supports the export of object lights (point lights, spotlights, directional lights) as well as distant lights. Area lights and linear lights are not supported. Distant lights are exported as directional lights with a remote origin.
IK Support
IK functionality added in Shade3D 13 is supported.
Select Apply from the IK pop-up menu to add IK information to the FBX file. Select Bake to record the IK movement as key frames, without exporting IK data to the FBX file.
Important Notes Regarding FBX Export
- OpenSubdiv Edge Sharpness values are supported and exported automatically.
- If subdivision surfaces are applied to polygon mesh objects, the Joint values in the Skin Window may not be replicated correctly.
- If multiple key frames overlap in the same sequence of a joint, only one key frame is exported. If you want to export multiple key frames, adjust the position of the key frames so they do not overlap in the same sequence.
- Depending on the destination application, IK data may not be read properly. In that case, export using the Bake option.
- Shade3D scenes with joints in which IK is assigned directly to the Root Part (such as IK-root/IK-end/IK-Goal) may not export correctly even in applications that support IK data. In that case, move the joint with IK inside a Part before exporting to FBX.
- If Skin is applied to polygon mesh or curved surface objects inside a joint hierarchy (such as when animating a human figure), depending on the destination application the Skin deformation may not animate correctly. In that case, place the object with Skin outside the joint hierarchy. If Skin is not affecting the polygon mesh or curved surface, deleting the Skin data will stabilize the animation. In this case, place the object inside the joint hierarchy.
As an example, here the eyeball mesh is located within the bone hierarchy:
In this case, if skin settings have been applied to the eyeball mesh, they should be deleted.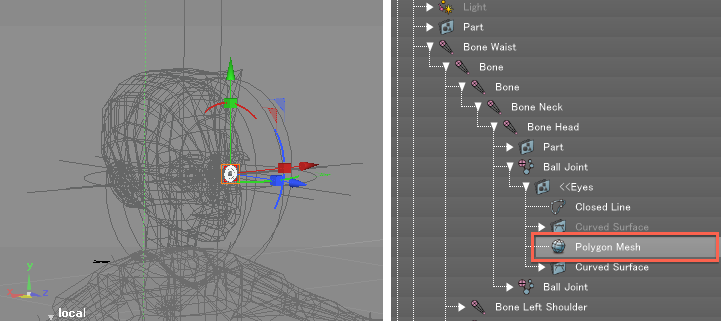
- IK constraints do not work properly in the exported FBX file if IK is assigned to animations using bones in Shade3D. In this case, under the Animation group in the FBX Export dialog box, select Intervals for Output and Bake for IK.
- The Skew transformation matrix does not export properly in scene hierarchies with parts or joints.
This is because the FBX format itself uses the scale, rotate, and translate elements to define the object.
If the scene contains objects with Skew applied, a warning will appear in the Message Window during export with the name of the offending part or joint. - If a transformation matrix has a negative Scale value in scenes hierarchies with parts or joints, the faces may be flipped.
In that case, try tracing the individual polygon mesh or curved surface back to the root part and count how many parts have a negative Scale value. If an odd number, add a dummy part with a negative Scale value in between the object and the Root Part.
If this still does not solve the problem, try the following steps:
- While holding down the Space key, right-click in the Figure Window (and hold).
- From the pop-up menu that appears, select Move > Reset All Transformations.
- In the Mac App Store version of Shade3D for Unity, it is highly recommended that the Embed Images in FBX File option is checked when exporting images.
When deselected, images other than external reference images won't be copied next to the FBX file properly.
Important Notes Regarding Export for Unity
Unity's FBX import does not load all information stored in the FBX file.
Below are some notes regarding the information that can be passed to Unity 3.5 from an FBX file exported from Shade3D.
Information Passed to Unity
- Parts/Joints
Retained as null nodes or skeletons. - Polygon meshes
Divided into triangles in Unity. - UV
Unity can have two UV layers. The second UV layer is used as a lightmap within Unity. - Face Groups
- Texture images
Texture images are only passed to Unity when the Bake Texture Images option is selected in the FBX Export dialog box.
When Unity loads the FBX file, texture image width and heights are automatically converted to a power of 2 (16, 32, 64, 128, and so on).
- Surface Attributes (Materials)
Only one layer each of diffuse and normal mapping (including texture images) can be passed.
Transparency per pixel can be set using the diffuse color image's alpha channel. - Animation Settings
Key frames can be passed to Unity.
Information Not Passed to Unity
- Lights
- Cameras
Notes & Precautions
- In Unity, skin vertex weights are normalized to add up to 1.0.
- Unity imports FBX files with centimeters (cm) as the scene units.
After importing the FBX in Unity, the object's Scale Factor is multiplied by 0.01 to convert the coordinates to meters (m). - Object names, material names, and texture image names will not load correctly with double-byte characters.
When passing objects, master surfaces, and images from Shade3D 3d FBX Export, use single-byte alphanumeric characters only. - Bones must have unique names in Unity.
If another bone shares the same name the animation will not run correctly. -
After importing an FBX as an asset in Unity, the material name will be overwritten with the texture name.
If a single texture is shared by multiple materials, the materials will be consolidated into one.
This problem can be avoided by taking the following steps after importing the FBX in Unity:
- Select the Assets object in the Project Window, and in the Inspector Window display the Import Settings.
- Under Material Naming, change the "By Base Texture Name" setting to "From Model's Material".
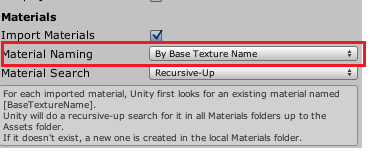
- Click Apply.