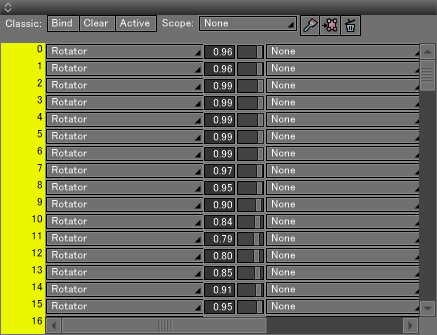
Classic Skin Type
The classic (legacy) skin window. Compatible with skin settings used in past versions of Shade3D, through 13.0.
Apply settings using the tool bar at the top of the Skin Window, and set the weight values for joints bound to each vertex by entering values into the text boxes or using the sliders.
Note Vertex Blending provides greater compatibility with data used in other 3DCG tools and the FBX file format.
Caution The Classic Skin Type and Vertex Blending are not mutually compatible. However, it is possible to do a basic conversion to Vertex Blending from the Classic Skin Type.
| Skin |
|---|

|
Toolbar
- Bind
- Applies binding to the selected vertices within the specified Scope.
- Clear
- Clears all joint and bone settings applied to the selected vertices. Hold down Ctrl or Z (Win) | Option (Mac) while clicking Clear to remove joints and bones from all vertices, including unselected vertices.
- Active
- If the Skin Window isn't large enough to display all the vertices at once, the Active button scrolls the Skin Window to display the first selected vertex.
- Scope Pop-up Menu
- Allows selection of the joints whose vertices will be bound. If None is selected, the closest joint to the selected vertex will automatically be bound.
- Vertex List
- The vertices are listed along the left side of the Skin Window. All the vertices of the selected object are listed by ID.
- Joint List
- Joints bound to any of the vertices are listed to the right of the Vertex List. If a joint has not been bound to the vertex, None is displayed.
- Joint Pop-up Menu
- Click the Joint List to open the Joint pop-up menu. This menu shows the joints that can be applied to all the selected control points. Select a joint from the menu to apply it to the selected control point.
- Joint Application
- Adjusts the application rate of joints for each control point.
- Weight Paint
- Click this button to start or stop using the Weight Paint tool.
- Covert to Vertex Blending Skin
- Converts the Classic Skin Type to Vertex Blending. In the dialog box that appears select OK to confirm the conversion, or Cancel if you change your mind.
- Clear All Skin Settings
- Deletes all Skin data, including Skin Type. Doing this returns the Skin Window to the Skin Type selection option.
Warning Conversion from the Classic Skin Type to Vertex Blending is basic, and a perfect conversion is not guaranteed. For this reason, it is possible that the conversion results in unintended values. Before doing this conversion, be sure to save your Shade3D scene file just in case you run into problems.
Note Shade 13 or Shade 12 Compatible can be chosen for the skin interpolation method. To switch interpolation methods, select a ball joint and in the Object Info Window use the Interpolation pop-up menu.
Note When using Cut, Copy, Paste, or importing or exporting objects with joints bound to control points, the applied joints are saved with the object.
Note Joint blending is a method of balancing the effects binding has on other objects in the joint hierarchy. For example, when a bone moves, the skin on the inside near the joint can be adjusted so as to intersect just the right amount.