Particle Physics Reference
Here each of the Particle Physics settings and functionality are explained.
Particle Emitter Settings Dialog Box
Access settings related to Particle Emitters.
In Browser select emitter [Emitter - Particle Physics], then in Browser select menu Attributes...> Particle Emitter Settings...to access settings.
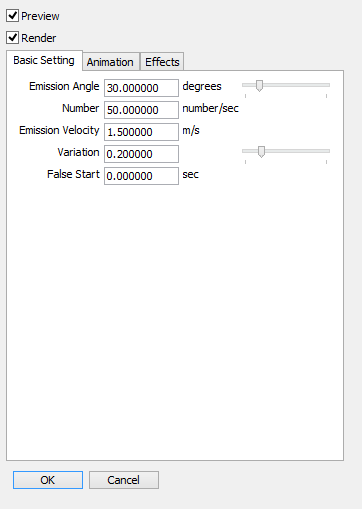
- Preview
- Displays particle motion set in the Motion Window in the Figure Window.
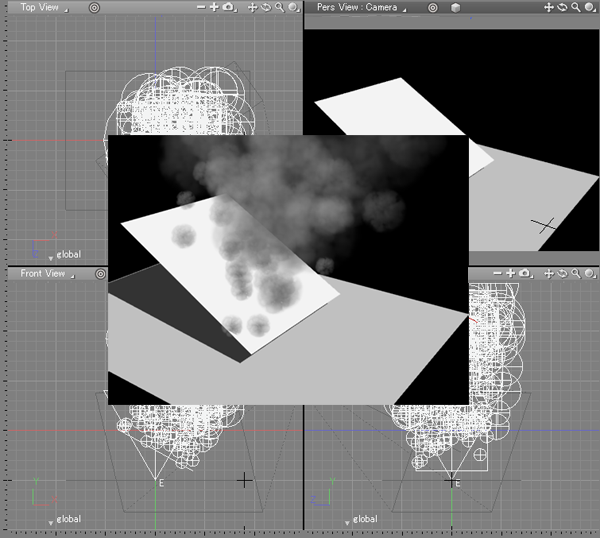
Particles are shown as an aggregation of spheres. - Render Checkbox
- When checked, the particles are rendered along with other objects.
Basic Settings Tab
- Emission Angle Slider, Text Box
- Sets the angle at which the particles are emitted. The axis passing through the center of the particle emitter cone is considered 0.0.
- Number Text Box
- Sets the number of particles emitted per second.
In a 30 frames-per-second animation, this number divided by 30 will be the number of particles emitted per frame. - Emission Velocity
- Sets the initial velocity of the particles in meters per second (m/s).
- Variation
- Varies the life and emission velocity of each particle for a more natural look.
- False Start
- Delays the emission of the particles by the specified number of seconds.
Animation Tab
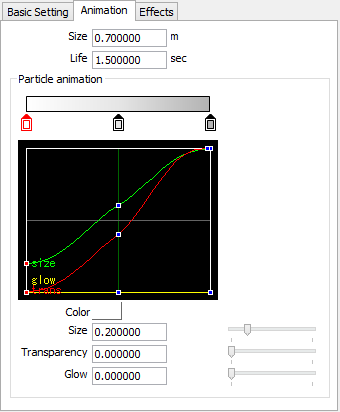
- Size
- Sets the maximum initial size of the particles, in meters.
The graph measures 0 to 100%, making it possible to animate the particles size. - Life
- Sets the lifetime of the particle from its generation until it disappears, in seconds.
- Particle Animation
-
- Gradient Bar

Sets the color variation of the emitted particles. Up to six new markers can be added by clicking on the Gradient Bar.
To move a marker, click and drag it along the Gradient Bar. To delete a marker, click and drag it up or down, away from the Gradient Bar. The markers on each end cannot be moved or deleted.- Markers

Marks the thresholds along the Gradient Bar for the color.
In addition, it also modifies size, transparency and glow.- Lifecycle Graph
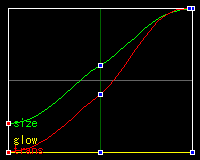
Displays the size, transparency and glow of the particles over time. The markers are represented by points on the graph.- Color Box
- Click on the box to select a new color for the currently selected marker.
- Size
- Sets the size ratio based on position linked to a Marker on the Lifecycle Graph.
- Transparency Slider, Text Box
- Sets the transparency ratio based on position linked to a Marker on the Lifecycle Graph.
- Glow
- Sets the glow ratio based on position linked to a Marker on the Lifecycle Graph.
0.0 does not emit any glow. When set to 1.0, glow is emitted in the specified color.
Effects Tab

- Receive Light
- Sets the particle emitter to receive light. When off, the particles are not affected by lights in the scene and keep the color set by the Billboard.
Objects set as particles do not receive light. - Blend Glow
- Blends the particles set by the billboard with the glow values set in the Animation Tab using an addition blend.
When checked, creates a sparkling effect. - Drop Shadow
- Drops shadows from a light source. Distant lights, point lights and spot lights are supported. Objects set as particles do not drop shadows.
Wind Settings Dialog Box
Settings for all the Wind Effects (Cross Wind, Turbulent Wind, Tornado Wind and
Gravitational Pull) can be made from the Wind Settings Dialog Box. Wind settings can be previewed in the Figure window.
To open the Wind Settings Dialog Box, in Browser select the Wind [Particle
Physics Name of the Wind] Part, then menu Attributes>Wind
Settings....
Cross Wind
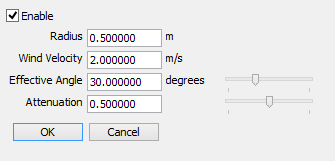
- Enable
- Clear this checkbox to disable the Cross Wind effect.
- Radius
- The radius of the Wind Object centered around the start point.
- Wind Velocity
- The wind velocity at the start point of the Wind Object.
- Effective Angle
- The angle of the wind object's end point from its start point.
- Attenuation
- Measures how fast the wind velocity drops with distance from the start point.
Turbulent Wind
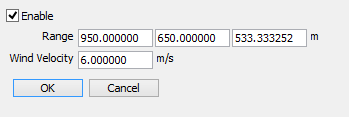
- Enable
- Clear this checkbox to disable the turbulent wind effect.
- Range
- The size of the turbulent wind area in meters, measured in the X, Y and Z directions.
- Wind Velocity
- Measures the maximum wind velocity inside the turbulent wind range.
Tornado Wind
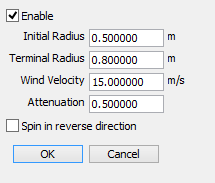
- Enable
- Select this checkbox to enable the Tornado effect.
- Initial Radius
- Defines the radius of the tornado at the start point.
- Terminal Radius
- Defines the radius of the tornado at the end point.
- Wind Velocity
- Measures the maximum wind velocity at the start point. ?
- Attenuation
- Measures how fast the wind velocity drops with distance from the start point.
- Spin in Reverse Direction
- Enable this checkbox to reverse the direction of rotation, so that the tornado spins counter-clockwise as viewed from above.
Normally the tornado wind spins clockwise.
Gravitational Pull
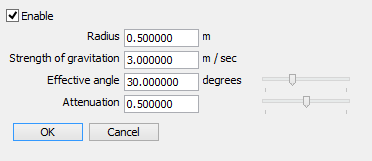
- Enable
- Clear this checkbox to disable the Gravitational Pull.
- Radius
- The radius of the circle centered around the start point. The terminus of the gravitational pull is the base point.
- Strength of Gravitation
- Defines the strength of the gravitational pull at the start point.
- Effective Angle
- The angle of the end point of the gravitational pull from the start point.
- Attenuation
- Measures how fast the strength of the gravitational pull drops with distance from the start point.
Object Physics Settings Dialog Box
Access and modify settings related to objects that can accept Physics based settings.
The Object Physics Settings Dialog Box is accessible by selecting an object inside the physical [physical - Particle Physics] Part in the Browser and choosing menu Attributes > Physics Settings....
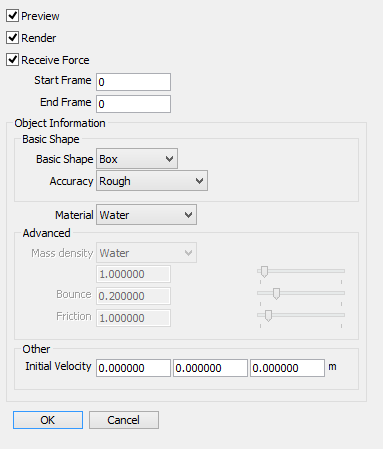
- Preview
- Displays the object with the applied Object Physics Settings in the Figure Window.
- Render
- Renders the selected object after applying the Object Physics Settings.
- Receive Force
- If checked, allows the selected object to receive force from the physics operations of other objects.
- Start Frame
- Enables the object to be affected by other objects with collision settings applied, effective from the Start Frame. If both the Start Frame and the End Frame are set to 0, the object will receive forces from other object throughout the animation.
- End Frame
- Enables the object to be affected by other objects with collision settings applied, ending with the End Frame. If both the Start Frame and the End Frame are set to 0, the object will receive forces from other object throughout the animation.
- Object Information
-
- Basic Shape Group
-
- Basic Shape Pop-Up Menu
- Sets the preview shape displayed in the Figure Window. Sphere, Box or Mesh objects can be selected. Preview objects are marked by a "p" in the Figure Window.
- Accuracy Pop-Up Menu
- Sets the number of subdivisions of the preview object.
Select from Coarse (no subdivision), Normal (8 subdivisions), Fine (16 subdivisions) and Very Fine (32 subdivisions).
- Material Pop-Up Menu
- The type of material determines the Mass Density, Bounce and Friction values.
Choose from Gold, Uranium, Lead, Copper, Iron, Aluminum, Magnesium, Water, Wood, Air or Smoke, or select Custom to specify other settings for the Mass Density, Bounce and Friction of the object. - Advanced Settings
- These options are only available if the Material Pop-up Menu is set to Custom.
- Mass Density
- The average density of the particle.
Choose from Gold, Uranium, Lead, Copper, Iron, Aluminum, Magnesium, Water, Wood, Air or Smoke, or select Custom to specify a value. - Bounce
- Sets the amount of bounce exhibited by the particles.
- Friction
- Sets the coefficient of friction for collisions.
- Other Settings
-
- Initial Velocity
- Sets the initial velocity of the object in the X, Y and Z directions (from left to right respectively), in meters per second (m/s).
Particle Physics Settings Dialog Box
You can modify Billboards created by selecting Toolbox: Create menu Particle Physics > Billboard.
To access this dialog from the Browser, select the particle (particle billboard) [Billboard - Particle Physics] Part, then select Attributes> Physics Settings...
- Object Information
-
- Basic Shape Group
-
- Basic Shape Pop-Up Menu
- Sets the preview shape displayed in the Figure Window. Sphere, Box or Mesh shapes can be selected. Preview objects are marked by a "p" in the Figure Window.
- Accuracy Pop-Up Menu
- Sets the number of subdivisions of the preview object.
Select from Coarse (no subdivision), Normal (8 subdivisions), Fine (16 subdivisions) and Very Fine (32 subdivisions).
NoteBillboard particles are always set to a Sphere basic shape and Coarse accuracy.
- Material Pop-Up Menu
- The type of material determines the Mass Density, Bounce and Friction values.
Choose from Gold, Uranium, Lead, Copper, Iron, Aluminum, Magnesium, Water, Wood, Air or Smoke, or select Custom to specify other settings.- Advanced Settings
- These options are only available if the Material Pop-Up Menu is set to Custom.
- Mass Density
- The average density of the particle.
Choose from Gold, Uranium, Lead, Copper, Iron, Aluminum, Magnesium, Water, Wood, Air or Smoke, or select Custom to specify other settings. - Bounce
- Sets the amount of bounce exhibited by the particles.
- Friction
- Sets the coefficient of friction for collisions.
- Collision Detection Group
-
- Collision Detection
- Particles will be affected by the collision detection of other objects.
- Collision Detection of Particles
- Particles will be affected by the collision detection of other particles.
- Particles Disappear after Colliding
- Particles that collide with other objects or particles will disappear.
Billboard Settings Dialog Box
Modify settings for Billboard objects, objects created by selecting Toolbox: Create Plugins Group menu Particle Physics > Billboard.
Select the particle [Particle Physics - Billboard] Part then from Browser menu Attributes>Billboard Settings....
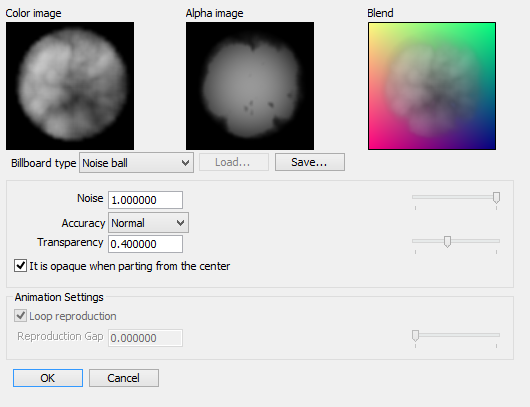
- Picture Box
- See a preview of the Billboard image.
Displays a preview of the Color image, Alpha image and Blend. If you load a video, the animation plays. - Billboard Type Pop-Up Menu
- Select a Billboard type.
You can select from Noise Ball or custom image. - Load... Button
- Load an image file to become the Billboard image.
This is only available if the Billboard Type is set to custom image. - Save... Button
- The current Billboard custom image is saved as a file.
If you select the Billboard type Noise Ball, then the image of the noise ball is saved as an RGBA image. If you select the Billboard type Custom Image, the Master Image applied to the Billboard is saved. - Noise
- Sets the contrast value of the noise.
This is only applicable if the Billboard type pop-up menu is set to Noise Ball. - Accuracy
- Sets the density of the noise.
You can select from Rough, Normal and Fine values. - Transparency
- Sets the Transparency value. Changes appear only in the alpha of the Picture Box.
- It is opaque when parting from the center
- When checked, the alpha becomes more transparent as distance increases from the center. It is only available if the Billboard type selected is Noise Ball.
- Loop Reproduction
- If a movie is selected as a Billboard image, then the movie plays in a loop.
- Reproduction Gap
- If a movie is selected as a Billboard image, then the start position of the movie is randomized.
Particle Physics Settings Dialog Box
This dialog provides the necessary world rendering settings for Particle Physics.
This Particle Physics Settings dialog can be access from menu Render > Render Settings, Effects Tab, then from the Effector set to Particle Physics, click the Set... Button.
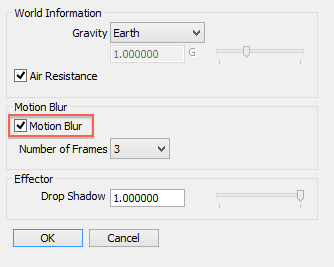
- World Information Settings
-
- Gravity Pop-up Menu
- Select Custom to specify another value for gravity.
You can also choose from Custom, Jupiter, Neptune, Earth, Saturn, Venus, Uranus, Mars Mercury and Moon. - Gravity
- You can set the custom value of gravity in Gs. 9.8 m/s^2 corresponds to 1 G, 1.0 or as on Earth. This option is available if you select Custom from the Gravity Pop-Up Menu.
- Air Resistance
- Enables air resistance.
- Motion Blur Settings
-
- Motion Blur
- Enables Motion Blur.
- Number of Frames
- Sets the number of frames over which the motion blur appears.
- Effector Settings
-
- Drop Shadow
- Sets the strength of shadows dropped by Billboard particles, with values approaching 1.0 producing darker shadows.
Shadows cast by Billboard particles on each other are not affected by this setting.