UC-win/Road 3D Printing Assistance Tool
| Basic | Standard | Professional |
|---|---|---|
| - | - | O |
3D printing tool for 3DS file exported from UC-win/Road has been added in the 3D Printing Assistant.
Interface Control Bar > 3D Printing Assistant > UC-win/Road 3D Printing Assistance Tool
Interface Window Layout Selector > 3D Printing > UC-win/Road 3D Printing Assistance Tool
Main Menu View > 3D Printing Assistant > UC-win/Road 3D Printing Assistance Tool
UC-win/Road 3D Printing Assistance Tool Button
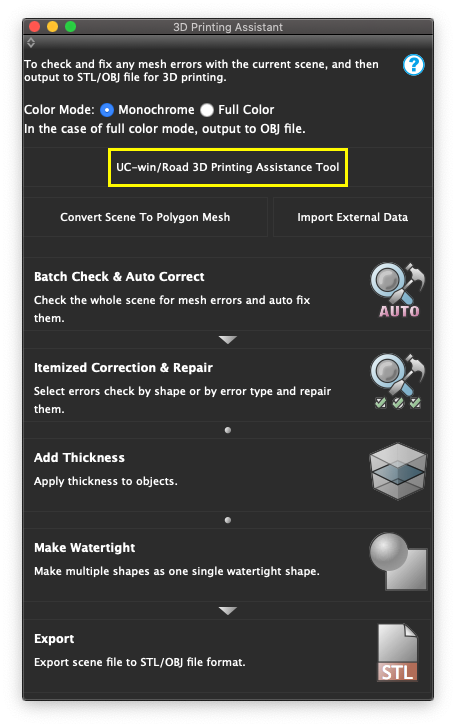
- UC-win/Road 3D Printing Assistance Tool
- Display UC-win/Road 3D Printing Assistance Tool.
UC-win/Road 3D Printing Assistance Tool
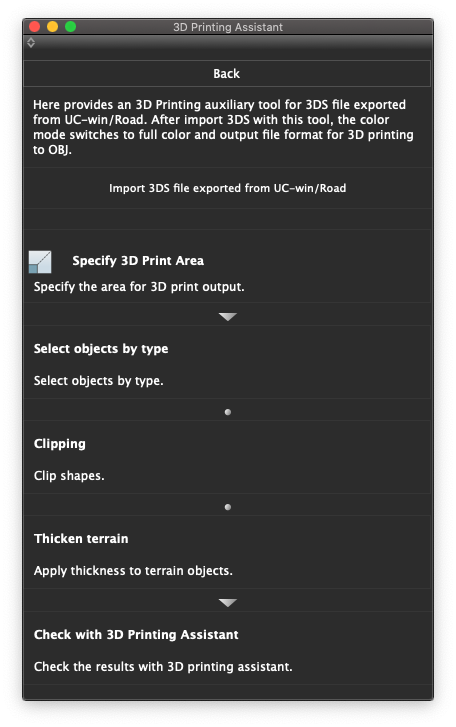
- Back
- Return to top menu.
- Import 3DS file exported from UC-win/Road
- Import 3DS file exported from UC-win/Road.
- Specify 3D Print Area
- Click to see the options.
- Specify 3D print output area.
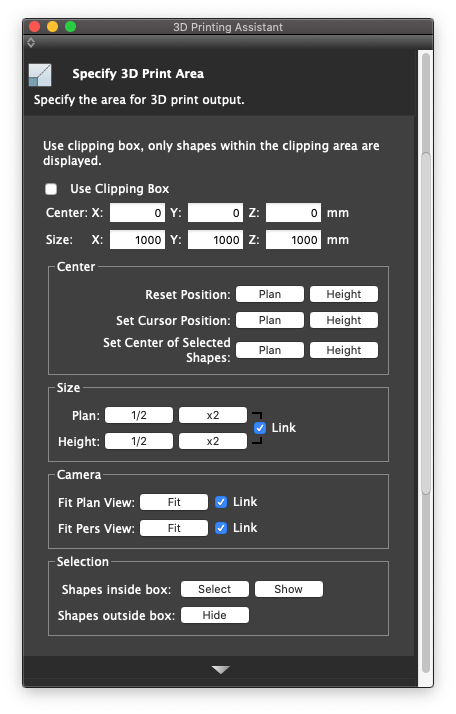
- Use Clipping Box
- Enable to use clipping box.
- Only shapes within the clipping area are displayed.
- Center
- The center coordinates of clipping box.
- Size
- The length, width and height of clipping box.
- Center group
-
- Reset Position
- Set clipping box center to the origin.
- Set Cursor Position
- Set the clipping box center as cursor position.
- Set Center of Selected Shapes
- Set the clipping box center as the center of selected shape.
- Size group
-
- Plan
- Reduce or double the flat size of the clipping box by 1/2.
- Height
- Reduce or double the height of the clipping box by 1/2.
- Link
- Keep proportion.
- Camera group
-
- Fit Plan View
- Move and zoom to make clipping box fit the multiview projection window.
- Link
- Enable to update automatically.
- Fit Pers View
- Move and zoom to make clipping box fit the pers view window.
- Link
- Enable to update automatically.
- Selection group
-
- Shapes Inside Box
- Display and select shapes in the clipping box.
- Shapes Outside Box
- Hide the shapes out of the clipping box.
- Select Objects by Type
- Click to see the options.
- Use the button to select and delete each unsuitable shape for 3D printing, such as road, railway, intersection, terrain, model, billboard shape except for custom object, and model less than 2mm when loaded in millimeters on the 3DS.
- Shapes Inside Box
- Select shapes inside clipping box.
- Select
- Select shapes inside clipping box.
- Show
- Display shapes inside clipping box.
- ROAD:Road
- Seletc road shape inside clipping box.
- RAIL:Railway(Line)
- Seletc railway shape inside clipping box.
- INTR:Intersection
- Seletc intersection inside clipping box.
- SIGN:Road Sign
- Seletc road sign inside clipping box.
- RMOD:Road Model
- Seletc road model inside clipping box.
- MODL:Model
- Seletc model inside clipping box.
- FBXS:FBX Scene
- Seletc FBX scene inside clipping box.
- MARK:Road Marking
- Seletc road marking inside clipping box.
- TREE:Tree(2D)
- Seletc tree(2D) inside clipping box.
- TERR:Terrain
- Seletc terrain inside clipping box.
- BACK:Backdrop
- Seletc backdrop inside clipping box.
- PLIN:Powerline
- Seletc powerline inside clipping box.
- DMOD:Custom Object
- Seletc custom object inside clipping box.
- Select Smaller than mm
- Select the shapes that are less than or equal to the specified size in the clipping box.
- Delete
- Delete selected shapes.
- Clipping
- Click to see the options.
- Clip shapes by clipping box.
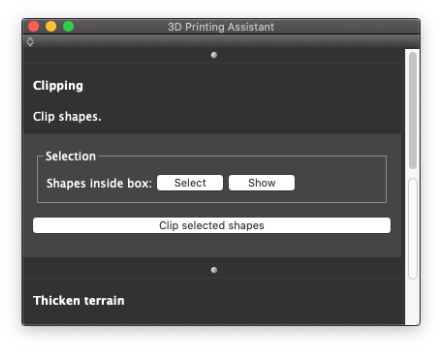
- Shapes Inside Box
- Select shapes inside clipping box.
- Select
- Select shapes inside clipping box.
- Show
- Display shapes inside clipping box.
- Clip Selected Shapes
- Clip selected shapes by clipping box. The creation of split shape is not available.
- Apply Thickness to Terrain Objects
- Click to see the options.
- Thicken the terrain.
- After merging the relevant shapes and removing duplicate Vertices, thicken up to the Vertical height of zero. The relevant shapes include terrain(TERR), road(ROAD),railway(RAIL) and intersection(INTR).
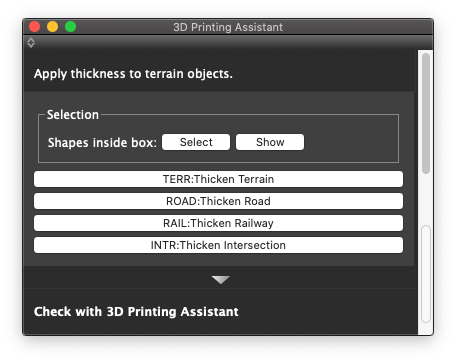
- Shapes Inside Box
- Select shapes inside clipping box.
- Select
- Select shapes inside clipping box.
- Show
- Display shapes inside clipping box.
- TERR:Thicken Terrain
- Thicken the shape of the terrain (shape name TERR or TERR + sequential number).
- ROAD:Thicken Road
- Thicken the shape of the road (shape name ROAD or ROAD + sequential number).
- RAIL:Thicken Railway
- Thicken the shape of the railway (shape name RAIL or RAIL + sequential number).
- INTR:Thicken Intersection
- Thicken the shape of the intersection (shape name INTR or INTR + sequential number).
- Check with 3D Printing Assistant
- Check the output with the 3D Printing Assistant.
- Click to go to the check page of 3D Printing Assistant.
Note Color Mode is Full Color.
Note Output in OBJ format.